During the spring semester of 2015, I completed a course on C++ and I have been itching to find a project where I could put those skills to use. Furthermore, I have attained post-baccalaureate certificates in Computer Aided Design (CAD) and Building Information Modeling (BIM) which involve using complex computer programs to create 2D technical drawings and 3D models. These programs are enigmatic to the end-user but it is spectacular the things people create using them. However, I have only used my design and computer graphics skills as a hobby. But that is about to change. I am going to start contributing to the development of Blender. An open-source 3D modeling, animation suite and gaming engine. This is extremely exciting for me as I have always enjoyed using these programs and now I will be involved in creating them.
In this post, I am going to walk through the process of setting up the blender development environment on Windows 10 and Visual Studio 2017 (VS) so that I can code and debug natively in VS. In doing this, I will provide a brief overview of the CMake tooling, discuss the new CMake support in Visual Studio 2017, detail the process per the development documents at wiki.blender.org as it relates to the native process and identify a starting point for developing on Blender. Let’s begin.
Walkthrough
Be aware that there are multiple entry points into building the source code successfully with CMake which I found out the hard way. Ultimately, I want a visual studio solution file to work with because that is where I am most comfortable. Let me itemize the different attempts so you don’t have to. First, I installed CMake separate to VS2017 and used the CMake GUI to create the visual studio solution. Second, I got VS to build the source code into a temp folder. Lastly, I followed the blender.org instructions and used the command-line and provided batch file. Each attempt provided the same output of a directory with a solution file and many project files. I did not know this at the time but this output folder is what I would end up building. I finally discovered the below high-level overview.
High-level Overview
- Install Visual Studio 2017
- Install SVN
- Clone Source Code in VS using Git
- Generate solution files using CMake (VS completes this step while generating cache step but it’s good to know)
- Compile Blender
Installing Visual Studio 2017
The free Community edition includes everything you need to begin developing in any area. So, go ahead and grab the free version here. The new installation experience in Visual Studio is awesome. The VS team has made the installation process simpler and easy to maintain by separating the content into workloads. However, even though they have done this I still install almost everything or everything that I hope to use. You don’t have to do this just make sure to install the Desktop development with C++ workload. It is important to note that Git and CMake are now first-class citizens in VS. This means that installing VS includes Git and installing the C++ tooling includes CMake and they are not an extra install process.
Note that the blender.org documentation states to install CMake separate to VS. However, this is unnecessary since VS now includes CMake.
You may be wondering what is CMake and why is it so important to this project. I’ll explain that next.
What is CMake?
Honestly, I had never heard of CMake before I started working on this project. However, stated directly on cmake.org, it is a suite of open-source cross-platform build, test and package tools. Awesome. The latest support for CMake in Visual Studio 2017 makes quite a lot of sense because Microsoft has invested heavily in open-source and cross-platform development tooling in recent years. This is great for any dedicated Visual Studio developer because expanding the toolset for a developer is like dipping strawberries in sugar. The strawberries are already sweet but dipping them in sugar is even better. Anyway, the documents at blender.org state that the source code compiles on a Mac using xCode, Windows using Visual Studio or several of the Linux distro’s and IDE’s. Which goes to show that CMake works. As stated before I am using Visual Studio 2017 on Windows 10 and there is a great blog post on the Visual C++ Blog that details the capabilities of CMake in VS2017 as a result, I am not going to go into too much detail. Let’s clone the repository.
Clone the Blender Git Repository
- Create a top-level development folder to work from. I am using blenderdev and the blender.org docs use blender-git.

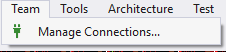
- In VS navigate to Team tab on the menu bar and select Manage Connection.
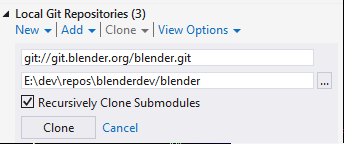
In the local repository section, select clone and copy the git://git.blender.org/blender.git into the available textbox.
- Make sure to change the location of the blender folder to the folder you specified in step 1.
- It’s on by default but ensure the Recursively Clone Submodules checkbox is checked.
Select the clone button. Cloning might take a bit; the repository is quite large and VS/CMake needs to build a cache of the files.
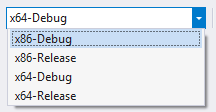
- Additionally, make sure to change the configuration to match your OS’s bit version. For example, x86 or x64. Doing this will use the correct compiler when building the files.
- After VS has completed building the files and indexing the cache you should see the output:

- Note the last line, build files have been written to C:\ …. This is not what we want. We want to put them in the folder we created in step 1. We will configure CMake in the next step.
Configuring CMake in VS2017
We want to build the files in our working folder. Configuring CMake will do this for us.
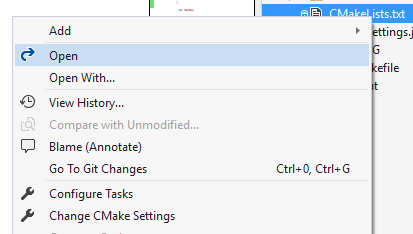
- Right-click the CMakeLists.txt and select Change CMake Settings from the flyout
- This will create a file titled CMakeSettings.json. Change the buildRoot node of each configuration in the file to “${projectDir}\..\blender_build_${name}”. This will build the files under your top-level folder in a folder titled blender_build_x64-Debug.

- Navigate to the Team Explorer tab in VS and right-click the CMakeSettings.json file and choose to ignore this local item. Note: this may get updated in the remote repository .gitignore and you might not need to do this.
- Let CMake finish generating the cache and close Visual Studio. We will install SVN and use the generated solution files in the blender_build_x64-Debug folder to work with the source code.
Installing and Cloning the SVN Source Libraries
Install TortoiseSVN and make sure that you put the SVN location in your path; select yes when the installer asks if you want to include it. Open a command prompt in your top-level working folder and checkout the 32 or 64-bit libraries from SVN.
svn checkout https://svn.blender.org/svnroot/bf-blender/trunk/lib/windows_vc14 lib/windows_vc14
Compile the Source Code in Visual Studio 2017
- Open the solution file located in the blender_build_x64 folder.
- Select the blender project and make it the startup project
- Build the INSTALL project
- Go get a coffee or a sandwich because it takes a while to build.
Conclusion
That completes the native setup of Blender in Visual Studio 2017. After the build of the install project from the solution explorer window there will be a folder in your working folder titled install which will contain the executable to run and debug/test your changes. The new CMake support in Visual Studio removes the unnecessary command-line scripts per the original documents. By installing, Visual Studio 2017 you get CMake and Git integration right out of the box. Additionally, Visual Studio’s CMake support provides a simple configuration mechanism. Unfortunately, the blender 32 and 64-bit libraries are in SVN as a result, you’ll have to install an SVN client. Following this development process will alleviate the need to install Visual Studio, CMake, Git and SVN resulting in just installing Visual Studio and SVN. It’s much simpler this way. If you have an questions feel free to contact me via any of my social media profiles; Twitter, Facebook , LinkedIn and Google.